

I mentioned to you a few days ago that I was chosen to participate in an exchange program with fabric fascination. I chose two fabric pieces called Nest Fabric Bundle by Valori Wells, and received half a yard of each to complete my project.

Since my real "thing" is sewing clothes, especially for my daughter, I decided to design something for Littleheart to wear this winter. I am always torn between practical and pretty. I would love to make Littleheart pretty blouses and cotton dresses, but they are not comfortable, and not suitable for daycare. And she really doesn't have many opportunities to wear them. She wears them once or twice and then they get too small. So I tend to stick to the knits, at least most of the time. So this was a bit of a design challenge - how can I integrate these pretty cotton fabrics into Littleheart's normal wardrobe style.
After thinking about it I came up with the following design:
.JPG)
I decided to make the main dress out of a thick knit material, and the pretty details would be made out of the material I got from fabric fascination. I searched around for light pink sweatshirt material, but could not find it anywhere. Then we finally got our new closet installed in our bedroom, and I began putting away my clothes (that had been in boxes for like a year!) and came across many garments I did not want anymore. I put them in a pile for the good will and forgot about them. Then suddenly, I went to the pile, picked up a pink sweater, and said to myself: perfect! This is just what I need! And so this project turned into a refashion along with the fabric exchange...
Here is a picture of the sweater:

Anyway, everything worked out nicely in the end, and I am pleased with the outcome...
Here are a few pictures of the details:
Bias tape around the neckline

Pleated over-sized pockets

Pleated skirt

So, would you like to know how I made it?
Keep reading!
What you will need:
- 2 cotton printed fabrics, 1/2 yard each. Go over to fabric fascination and check out her beautiful print fabrics.
- One old plain sweater or sweatshirt (that matches the print fabric), or sweatshirt material.
Drafting your pattern
If your little girl wears size 3-4T then you are welcome to download my pattern here. If not then take a long sleeve t-shirt that fits your child nicely (it should be longer then the waist, right under the bottom). Trace the t-shirt to make your front and back bodice. Have your pattern go out a bit on the bottom, making a slight a-line. Add seam allowance around the entire bodice. Trace the sleeves and add seam allowance.
Cutting
Cut a front and back bodice from your sweater/sweatshirt. Cut two sleeve pieces. If you are using a sweater/sweatshirt then you can use the existing sleeves, just make them smaller to fit your child.
Print cotton fabric 1
- cut six rectangles, 5.5"/6.5", for size 3-4 T.
- two pocket pieces
For the length, just decide how long you want the dress to be in the end, subtract the length of the bodice, and another 2" for the strip. What you have left is the lenth of the skirt pieces.
Print cotton fabric 2
- four rectangles, 4"/6.5", for size 3-4 T. (If you are not making size 3-4 T then take the same length you used for your three rectangles, and use a 4" width).
- Cut 2 strips 14.5"/2.5" for waistband
- Cut 2 strips, 6"/2.5", for top of pockets
- make a strip of bias tape (for a good tutorial go here)
You should have these pieces (plus sleeves, didn't take a pic of those)


Sewing
First lets make the skirt part. Sew your rectangles right sides together (use half inch seam allowance), on the long side, starting with fabric 1, then fabric 2...
fabric 1 - fabric 2 - fabric 1 - fabric 2 - fabric 1

Serge your edges or finish with a zigzag stitch.
Iron down your seams. Now serge (or zigzag) the top and bottom of your sewn together strip.

You now have two pieces that look like this:

Now mark the middle of your fabric 2 piece and create a box pleat, folding each edge towards your middle mark. Iron and stitch down, about 1/2 an inch from the edge.


Do the same for the back skirt piece.
You now have two pieces that look like this:

Now let's make the pocket.
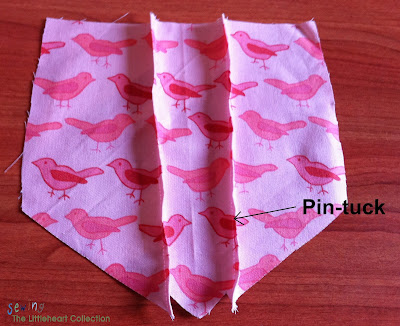
Make a fold (right sides together) where the middle point ends (see pic) and press.

Do this on both pockets. Open the fold. Then make a fold (wrong sides together) in the middle of the side point and press.

Now with this fold still folded, stitch all the way up along the fold, as close to the fold as possible, creating a pin-tuck. Do this on the other pocket too.
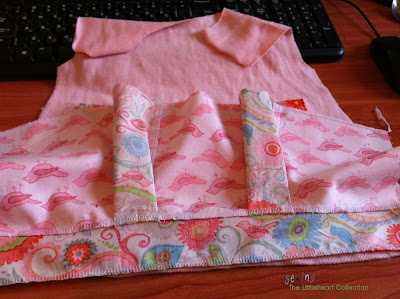
Now fold both folds so that your outer points meet the middle point. Pin down.

Take your 2 strips of fabric (the short ones) and fold along the long side. Press. Line the raw edge with the edge of your pocket.

Make sure your pleat is folded nicely under the strip. Stitch across, using 1/2 inch seam allowance. Fold your strip up, press and topstitch along the seam.

Sew across the pleat at the bottom point to hold in place.
Now fold the pocket under 1/4 " along the raw edges and press.

Pin your pocket to one side of your front bodice, fairly low down (2" from edge). Sew along the edges as close to the edge as possible (don't sew across the top). Then sew around again, a bit further in.
Do the same for the other pocket.
Your front bodice looks like this now:

Take one skirt piece and line up the side with the folded pleats to the raw edge of your long strip, right sides together. Sew across, using 1/2" seam allowance. Flip the strip up, press and topstitch across, folding the seam allowance towards the strip. Do the same with the other skirt piece.

Now take your new skirt piece and line the raw edge of the strip to the bottom of your front bodice. Sew across, using 1/2" seam allowance.
Flip the strip down, press and topstitch across, folding the seam allowance towards the strip. Do the same with the other skirt piece (with back bodice).
You now have your front and back dress piece:

Follow these instructions from Craftiness is not optional to make a button closure on the back bodice.
Sew together your shoulder seams.
Now take you bias tape and sew it to your neckline, starting on one side of the back bodice and going all the way around to the other side. At the edges fold under the bias tape for a clean finish.
If you are not familiar working with bias tape, here is a good tutorial.

Set in sleeves.
Sew side seams, starting at the wrists and sew all the way down to the hem.
Hem your dress, using a double needle.
Wow, you are already done!
Make a pair of leggings or wear with some thick tights and you have a cute outfit!


I must say, it is a bit too big for Littleheart, after these pictures (first time I tried it on) I took it in a little bit. And she still has room to grow into it. But that is ok, winter is still at least a month away here...
Make sure you follow totally tutorials and fabric fascination to see the other projects made for the exchange program....
I will be linking up to some of the link parties on this page .
fabric 1 - fabric 2 - fabric 1 - fabric 2 - fabric 1

Serge your edges or finish with a zigzag stitch.
Iron down your seams. Now serge (or zigzag) the top and bottom of your sewn together strip.

You now have two pieces that look like this:

Now mark the middle of your fabric 2 piece and create a box pleat, folding each edge towards your middle mark. Iron and stitch down, about 1/2 an inch from the edge.


Do the same for the back skirt piece.
You now have two pieces that look like this:

Now let's make the pocket.
Make a fold (right sides together) where the middle point ends (see pic) and press.

Do this on both pockets. Open the fold. Then make a fold (wrong sides together) in the middle of the side point and press.

Now with this fold still folded, stitch all the way up along the fold, as close to the fold as possible, creating a pin-tuck. Do this on the other pocket too.

Now fold both folds so that your outer points meet the middle point. Pin down.

Take your 2 strips of fabric (the short ones) and fold along the long side. Press. Line the raw edge with the edge of your pocket.

Make sure your pleat is folded nicely under the strip. Stitch across, using 1/2 inch seam allowance. Fold your strip up, press and topstitch along the seam.

Sew across the pleat at the bottom point to hold in place.
Now fold the pocket under 1/4 " along the raw edges and press.

Pin your pocket to one side of your front bodice, fairly low down (2" from edge). Sew along the edges as close to the edge as possible (don't sew across the top). Then sew around again, a bit further in.
Do the same for the other pocket.
Your front bodice looks like this now:

Take one skirt piece and line up the side with the folded pleats to the raw edge of your long strip, right sides together. Sew across, using 1/2" seam allowance. Flip the strip up, press and topstitch across, folding the seam allowance towards the strip. Do the same with the other skirt piece.

Now take your new skirt piece and line the raw edge of the strip to the bottom of your front bodice. Sew across, using 1/2" seam allowance.

Flip the strip down, press and topstitch across, folding the seam allowance towards the strip. Do the same with the other skirt piece (with back bodice).
You now have your front and back dress piece:

Follow these instructions from Craftiness is not optional to make a button closure on the back bodice.
Sew together your shoulder seams.
Now take you bias tape and sew it to your neckline, starting on one side of the back bodice and going all the way around to the other side. At the edges fold under the bias tape for a clean finish.
If you are not familiar working with bias tape, here is a good tutorial.

Set in sleeves.
Sew side seams, starting at the wrists and sew all the way down to the hem.
Hem your dress, using a double needle.
Wow, you are already done!
Make a pair of leggings or wear with some thick tights and you have a cute outfit!


I must say, it is a bit too big for Littleheart, after these pictures (first time I tried it on) I took it in a little bit. And she still has room to grow into it. But that is ok, winter is still at least a month away here...
Make sure you follow totally tutorials and fabric fascination to see the other projects made for the exchange program....
I will be linking up to some of the link parties on this page .
LOVE the dropped waist and the pleats made from contrasting fabric, Mira!!!
ReplyDeleteThanks Pam. I like the contrasting fabric too, and the material has a really nice feel :)
DeleteSo cute! Love it!
ReplyDelete:) Thanks Doda L!
DeleteI love the pleats on the pockets to match the skirt....great details!!!!
ReplyDeletethis is fabulous! I love projects that are a little "free form" and include up cycling. Thanks for posting this, it has sparked all kinds of ideas in my head! (oh - and how did you get to be part of a fabric exchange? that is cool)
ReplyDeleteIt is a program from totally tutorials (http://totallytutorials.blogspot.co.il/p/exchange-program.html). You have to look out for the exchanges a sign up. It is not always fabric, she has all kinds of craft supplies...
DeleteI love this dress! I'm expecting a little girl now. I've pinned this and look forward to making it for her in a couple of years! :-)
ReplyDeleteIt's super cute and I love dropped waists.Thanks for stopping by!
ReplyDeleteSo lovely!!! I love the colours and fabrics! Thanks so much for sharing the great tutorial! I'd love for you to visit my blog.
ReplyDeleteHappy week!
Hugs from Portugal,
Ana Love Craft
www.lovecraft2012.blogspot.com
Really cute dress & great tutorial! Thanks for sharing @ Submarine Sunday!
ReplyDeleteT'onna
Such cute and fun dress! It may be a little too big now, but looks great on your adorable model :)
ReplyDeleteI love those pockets! Thanks for the tutorial. It looks great on her.
ReplyDeleteThis is a great tutorial, thank you for linking up to my party!
ReplyDelete